
HACKEAR LA CONTRASEÑA DE WPA WIFI / WPA2 USANDO REAVER SIN LISTA DE PALABRAS
Reaver-WPS desempeña un ataque de fuerza bruta contra el número de pin de WiFi de un punto de acceso. Una vez encontrado el pin de WPS, WPA PSK se puede recuperar y alternativamente la configuración inalámbrica de AP puede ser reconfigurada. Con ayuda de profesores de curso de seguridad en redes y ethical hacking describimos los pasos y los comandos que ayudan al cracking las contraseñas WPA Wifi / WPA2 utilizando Reaver-WPS.
Reaver-wps enfoca sobre la funcionalidad de registro externo exigido por la especificación de la configuración de Wi-Fi protegida. Los puntos de acceso proporcionarán registradores autenticados con su configuración inalámbrica actual (incluyendo la WPA PSK), y también aceptan una nueva configuración del registrador.
Con el fin de autenticar como registrador, el registrador debe demostrar su conocimiento del número de PIN de 8 dígitos de la AP. Los registradores podrán autenticarse en un punto de acceso en cualquier momento y sin interacción con el usuario. Dado que el protocolo WPS se lleva a cabo sobre EAP, el registrador sólo tiene que estar asociado con el AP y no necesita ningún conocimiento previo de la encriptación o la configuración inalámbrica explica el profesor de curso de seguridad en redes y ethical hacking.
Reaver-WPS desempeña un ataque de fuerza bruta contra la AP, intentando todas las combinaciones posibles con el fin de adivinar el número PIN de 8 dígitos de la AP. Dado que el número de pines son totalmente numéricos, hay 10 ^ 8 (100.000.000) valores posibles para cualquier número de pin dado. Según experto de ethical hacking, el último dígito del pin es un valor de suma de control que puede ser calculada en base a los 7 dígitos anteriores, que el espacio clave se reduce a 10 ^ 7 (10, 000,000) valores posibles.
Otro factor que afecta la seguridad en redes es la longitud de la clave. Longitud de claves se reduce aún más debido al hecho de que el protocolo de autenticación WPS corta el pin en medio y valida cada medio individual. Eso significa que hay 10 ^ 4 (10.000) valores posibles para la primera mitad del pin y 10 ^ 3 (1000) valores posibles para la segunda mitad del pin, con el último dígito del pin siendo una suma de comprobación.
Reaver-WPS adivina la primera mitad del pin y luego la segunda mitad del pin, lo que significa que todo la longitud de clave para el número PIN WPS puede agotarse en 11.000 intentos. Estadísticamente, sólo tendrá la mitad de ese tiempo con el fin de adivinar el número PIN correcto. Vamos a ver cómo configurar e instalar Reaver-WPS con ayuda de profesores de curso de seguridad en redes y ethical hacking.
INSTALACIÓN:
Instalar Linux Wifislax, todo construido en él. (Reaver-WPS, libpcap y libsqlite3)
USO:
Generalmente los únicos argumentos necesarios para Reaver-WPS son el nombre de la interfaz y el BSSID del AP objetivo:
# reaver -i mon0 -b 00:01:02:03:04:05
El canal y el SSID del AP objetivo serán identificados automáticamente por Reaver-WPS, salvo que se especifique explícitamente en la línea de comandos:
# reaver -i mon0 -b 00:01:02:03:04:05 -c 11 -e linksys
Por defecto, si el punto de acceso cambia de canal, Reaver-WPS también cambiar su canal en consecuencia. Sin embargo, esta función puede ser desactivada mediante la fijación del canal de la interfaz explica experto de ethical hacking:
# reaver -i mon0 -b 00:01:02:03:04:05 –fixed
La recepción predeterminada del tiempo de espera es de 5 segundos. Este período de tiempo de espera se puede ajustar manualmente si es necesario.
# reaver -i mon0 -b 00:01:02:03:04:05 -t 2
El período de demora predeterminado entre los intentos del pin es de 1 segundo. Este valor puede ser aumentado o disminuido a cualquier valor entero no negativo. Un valor de cero significa que no hay retraso:
# reaver -i mon0 -b 00:01:02:03:04:05 -d 0
Algunas APs bloquearán temporalmente su estado WPS, por lo general durante cinco minutos o menos, cuando se detecte actividad “sospechosa”. De forma predeterminada cuando se detecte un estado bloqueado, Reaver-WPS comprobara el estado cada 315 segundos y no continuara ataques de fuerza bruta al pin hasta que el estado WPS este desbloqueado. Según profesores de curso de seguridad en redes y ethical hacking, esta comprobación puede ser aumentada o disminuida a cualquier valor no negativo:
# reaver -i mon0 -b 00:01:02:03:04:05 –lock-delay=250
Para un resultado adicional, la opción verbose puede ser proporcionada. Proporcionando la verbose dos veces aumentará la verbosidad y mostrará cada número del pin, ya que se intenta:
# reaver -i mon0 -b 00:01:02:03:04:05 -vv
El período de tiempo de espera predeterminado para la recepción de los mensajes de respuesta M5 y M7 WPS es .1 segundo. Este período de tiempo de espera se puede ajustar manualmente si es necesario (tiempo de espera máximo es de 1 segundo):
# reaver -i mon0 -b 00:01:02:03:04:05 -T .5
Aunque la mayoría de AP no les importa, el envío de un mensaje de EAP FAIL para cerrar una sesión WPS. Por defecto esta función está desactivada, pero se puede habilitar para aquellas AP que lo necesitan:
# reaver -i mon0 -b 00:01:02:03:04:05 –eap-terminate
En primer lugar, asegúrese de que su tarjeta inalámbrica está en modo monitor:
# airmon-ng start wlan0
Para ejecutar Reaver, debe especificar el BSSID del AP objetivo y el nombre de la interfaz en modo monitor (por lo general ‘mon0’, no ‘wlan0’, aunque esto puede variar en función de la tarjeta inalámbrica / controladores):
# reaver -i mon0 -b 00:01:02:03:04:05
Es probable que también desee utilizar -vv para obtener información verbose sobre progreso de Reaver:
# reaver -i mon0 -b 00:01:02:03:04:05 -vv
ACELERANDO EL ATAQUE
De forma predeterminada, Reaver-WPS tiene un retardo de 1 segundo entre los intentos del pin. Puede deshabilitar este retraso añadiendo ‘-d 0’ en la línea de comandos, pero a algunas AP podría no gustarle menciona el profesor de curso de seguridad en redes y ethical hacking:
De forma predeterminada, Reaver-WPS tiene un retardo de 1 segundo entre los intentos del pin. Puede deshabilitar este retraso añadiendo ‘-d 0’ en la línea de comandos, pero a algunas AP podría no gustarle menciona el profesor de curso de seguridad en redes y ethical hacking:
# reaver -i mon0 -b 00:01:02:03:04:05 -vv -d 0
Otra opción que puede acelerar un ataque es -dh-small. Esta opción indica a Reaver para utilizar un pequeño número secreto diffie-Hellman con el fin de reducir la carga computacional en la AP objetivo:
# reaver -i mon0 -b 00:01:02:03:04:05 -vv –dh-small
SUPLANTACIÓN DE MAC
En algunos casos es posible que se desee / necesite suplantar tu dirección MAC. Reaver es compatible con Suplantación de MAC con la opción -mac, pero hay que asegurarse de que ha falsificado su MAC correctamente con el fin de que funcione.
# ifconfig wlan0 down
# ifconfig wlan0 hw ether 00:BA:AD:BE:EF:69
# ifconfig wlan0 up
# airmon-ng start wlan0
# reaver -i mon0 -b 00:01:02:03:04:05 -vv –mac=00:BA:AD:BE:EF:69
Controladores inalámbricos compatibles
Los siguientes controladores inalámbricos han sido probados o reportados para trabajar con éxito con Reaver-WPS:
Los siguientes controladores inalámbricos han sido probados o reportados para trabajar con éxito con Reaver-WPS:
ath9k
rtl8187
carl19170
ipw2000
rt2800pci
rt73usb
SÓLO DE FORMA PARCIAL
Los siguientes controladores inalámbricos han tenido un éxito relativo, y pueden o no pueden trabajar en función de su tarjeta inalámbrica
ath5k
iwlagn
rtl2800usb
b43
CONCLUSIÓN
Si desea Pentest o Hackear sus contraseñas Wifi, entonces lo primero que se necesita es una tarjeta Wi-Fi compatible. Durante el curso de seguridad en redes y ethical hacking, tu tendrás la oportunidad de aprender a PenTest o hackear contraseñas Wifi, cómo inyectar, falsificar, configurar una AP falsa o Honeypot.
Pluja de Sons
Sistema de archivos linux en una sola imagen
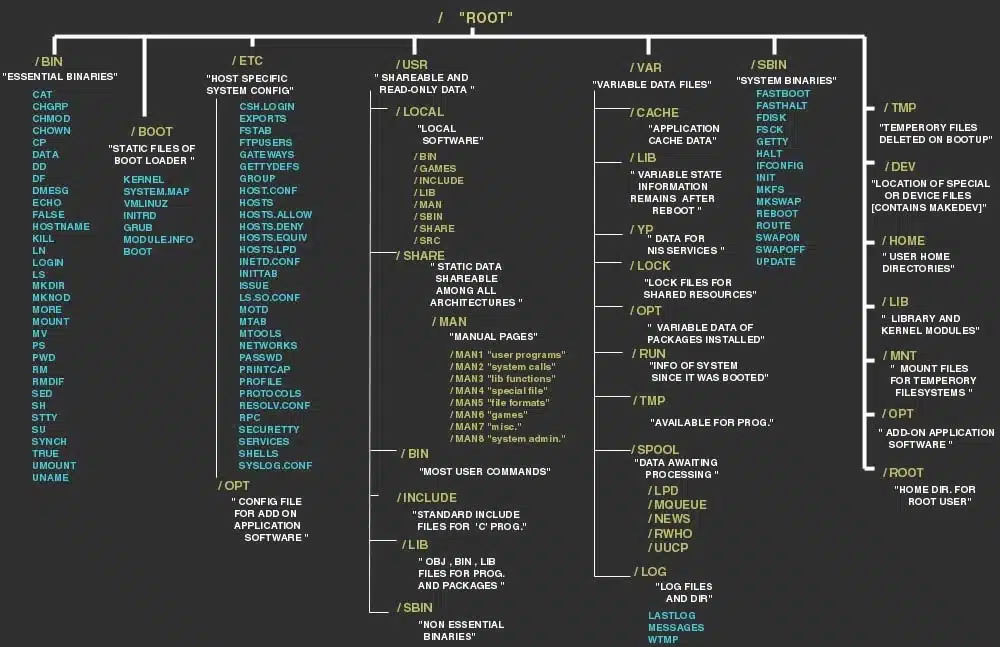
In order to manage all those files in an orderly fashion, man likes to think of them in an ordered tree-like structure on the hard disk, as we know from MS-DOS (Disk Operating System) for instance. The large branches contain more branches, and the branches at the end contain the tree’s leaves or normal files. For now we will use this image of the tree, but we will find out later why this is not a fully accurate image.
Primary hierarchy root and root directory of the entire file system hierarchy.
/bin
Essential command binaries that need to be available in single user mode; for all users, e.g., cat, ls, cp.
Essential command binaries that need to be available in single user mode; for all users, e.g., cat, ls, cp.
/boot
Boot loader files, e.g., kernels, initrd.
Boot loader files, e.g., kernels, initrd.
/dev
Essential devices, e.g., /dev/null.
Essential devices, e.g., /dev/null.
/etc
Host-specific system-wide configuration filesThere has been controversy over the meaning of the name itself. In early versions of the UNIX Implementation Document from Bell labs, /etc is referred to as the etcetera directory, as this directory historically held everything that did not belong elsewhere (however, the FHS restricts /etc to static configuration files and may not contain binaries). Since the publication of early documentation, the directory name has been re-designated in various ways. Recent interpretations include backronyms such as “Editable Text Configuration” or “Extended Tool Chest”.
Host-specific system-wide configuration filesThere has been controversy over the meaning of the name itself. In early versions of the UNIX Implementation Document from Bell labs, /etc is referred to as the etcetera directory, as this directory historically held everything that did not belong elsewhere (however, the FHS restricts /etc to static configuration files and may not contain binaries). Since the publication of early documentation, the directory name has been re-designated in various ways. Recent interpretations include backronyms such as “Editable Text Configuration” or “Extended Tool Chest”.
/etc/opt
Configuration files for add-on packages that are stored in /opt/.
Configuration files for add-on packages that are stored in /opt/.
/etc/sgml
Configuration files, such as catalogs, for software that processes SGML.
Configuration files, such as catalogs, for software that processes SGML.
/etc/X11
Configuration files for the X Window System, version 11.
Configuration files for the X Window System, version 11.
/etc/xml
Configuration files, such as catalogs, for software that processes XML.
Configuration files, such as catalogs, for software that processes XML.
/home
Users’ home directories, containing saved files, personal settings, etc.
Users’ home directories, containing saved files, personal settings, etc.
/lib
Libraries essential for the binaries in /bin/ and /sbin/.
Libraries essential for the binaries in /bin/ and /sbin/.
/lib<qual>
Alternate format essential libraries. Such directories are optional, but if they exist, they have some requirements.
Alternate format essential libraries. Such directories are optional, but if they exist, they have some requirements.
/media
Mount points for removable media such as CD-ROMs (appeared in FHS-2.3).
Mount points for removable media such as CD-ROMs (appeared in FHS-2.3).
/mnt
Temporarily mounted filesystems.
Temporarily mounted filesystems.
/opt
Optional application software packages.
Optional application software packages.
/proc
Virtual filesystem providing process and kernel information as files. In Linux, corresponds to a procfs mount.
Virtual filesystem providing process and kernel information as files. In Linux, corresponds to a procfs mount.
/root
Home directory for the root user.
Home directory for the root user.
/sbin
Essential system binaries, e.g., init, ip, mount.
Essential system binaries, e.g., init, ip, mount.
/srv
Site-specific data which are served by the system.
Site-specific data which are served by the system.
/tmp
Temporary files (see also /var/tmp). Often not preserved between system reboots.
Temporary files (see also /var/tmp). Often not preserved between system reboots.
/usr
Secondary hierarchy for read-only user data; contains the majority of (multi-)user utilities and applications.
Secondary hierarchy for read-only user data; contains the majority of (multi-)user utilities and applications.
/usr/bin
Non-essential command binaries (not needed in single user mode); for all users.
Non-essential command binaries (not needed in single user mode); for all users.
/usr/include
Standard include files.
Standard include files.
/usr/lib
Libraries for the binaries in /usr/bin/ and /usr/sbin/.
Libraries for the binaries in /usr/bin/ and /usr/sbin/.
/usr/lib<qual>
Alternate format libraries (optional).
Alternate format libraries (optional).
/usr/local
Tertiary hierarchy for local data, specific to this host. Typically has further subdirectories, e.g., /usr/local/bin/ , /usr/local/lib/, /usr/local/share/.
Tertiary hierarchy for local data, specific to this host. Typically has further subdirectories, e.g., /usr/local/bin/ , /usr/local/lib/, /usr/local/share/.
/usr/sbin
Non-essential system binaries, e.g., daemons for various network-services.
Non-essential system binaries, e.g., daemons for various network-services.
/usr/share
Architecture-independent (shared) data.
Architecture-independent (shared) data.
/usr/src
Source code, e.g., the kernel source code with its header files.
Source code, e.g., the kernel source code with its header files.
/usr/X11R6
X Window System, Version 11, Release 6.
X Window System, Version 11, Release 6.
/var
Variable files—files whose content is expected to continually change during normal operation of the system—such as logs, spool files, and temporary e-mail files.
Variable files—files whose content is expected to continually change during normal operation of the system—such as logs, spool files, and temporary e-mail files.
/var/cache
Application cache data. Such data are locally generated as a result of time-consuming I/O or calculation. The application must be able to regenerate or restore the data. The cached files can be deleted without loss of data.
Application cache data. Such data are locally generated as a result of time-consuming I/O or calculation. The application must be able to regenerate or restore the data. The cached files can be deleted without loss of data.
/var/lib
State information. Persistent data modified by programs as they run, e.g., databases, packaging system metadata, etc.
State information. Persistent data modified by programs as they run, e.g., databases, packaging system metadata, etc.
/var/lock
Lock files. Files keeping track of resources currently in use.
Lock files. Files keeping track of resources currently in use.
/var/log
Log files. Various logs.
Log files. Various logs.
/var/mail
Users’ mailboxes.
Users’ mailboxes.
/var/opt
Variable data from add-on packages that are stored in /opt/.
Variable data from add-on packages that are stored in /opt/.
/var/run
Information about the running system since last boot, e.g., currently logged-in users and running daemons.
Information about the running system since last boot, e.g., currently logged-in users and running daemons.
/var/spool
Spool for tasks waiting to be processed, e.g., print queues and outgoing mail queue.
Spool for tasks waiting to be processed, e.g., print queues and outgoing mail queue.
/var/spool/mail
Deprecated location for users’ mailboxes.
Deprecated location for users’ mailboxes.
/var/tmp
Temporary files to be preserved between reboots.
Temporary files to be preserved between reboots.
Types of files in Linux
Most files are just files, called regular files; they contain normal data, for example text files, executable files or programs, input for or output from a program and so on.
Most files are just files, called regular files; they contain normal data, for example text files, executable files or programs, input for or output from a program and so on.
While it is reasonably safe to suppose that everything you encounter on a Linux system is a file, there are some exceptions.
Directories: files that are lists of other files.
Special files: the mechanism used for input and output. Most special files are in /dev, we will discuss them later.
Links: a system to make a file or directory visible in multiple parts of the system’s file tree. We will talk about links in detail.
(Domain) sockets: a special file type, similar to TCP/IP sockets, providing inter-process networking protected by the file system’s access control.
Named pipes: act more or less like sockets and form a way for processes to communicate with each other, without using network socket semantics.
File system in reality
For most users and for most common system administration tasks, it is enough to accept that files and directories are ordered in a tree-like structure. The computer, however, doesn’t understand a thing about trees or tree-structures.
For most users and for most common system administration tasks, it is enough to accept that files and directories are ordered in a tree-like structure. The computer, however, doesn’t understand a thing about trees or tree-structures.
Every partition has its own file system. By imagining all those file systems together, we can form an idea of the tree-structure of the entire system, but it is not as simple as that. In a file system, a file is represented by an inode, a kind of serial number containing information about the actual data that makes up the file: to whom this file belongs, and where is it located on the hard disk.
Every partition has its own set of inodes; throughout a system with multiple partitions, files with the same inode number can exist.
Each inode describes a data structure on the hard disk, storing the properties of a file, including the physical location of the file data. When a hard disk is initialized to accept data storage, usually during the initial system installation process or when adding extra disks to an existing system, a fixed number of inodes per partition is created. This number will be the maximum amount of files, of all types (including directories, special files, links etc.) that can exist at the same time on the partition. We typically count on having 1 inode per 2 to 8 kilobytes of storage.
At the time a new file is created, it gets a free inode. In that inode is the following information:
Owner and group owner of the file.
File type (regular, directory, …)
Permissions on the file
Date and time of creation, last read and change.
Date and time this information has been changed in the inode.
Number of links to this file (see later in this chapter).
File size
An address defining the actual location of the file data.
The only information not included in an inode, is the file name and directory. These are stored in the special directory files. By comparing file names and inode numbers, the system can make up a tree-structure that the user understands. Users can display inode numbers using the -i option to ls. The inodes have their own separate space on the disk.
No hay comentarios:
Publicar un comentario